Creative activity:
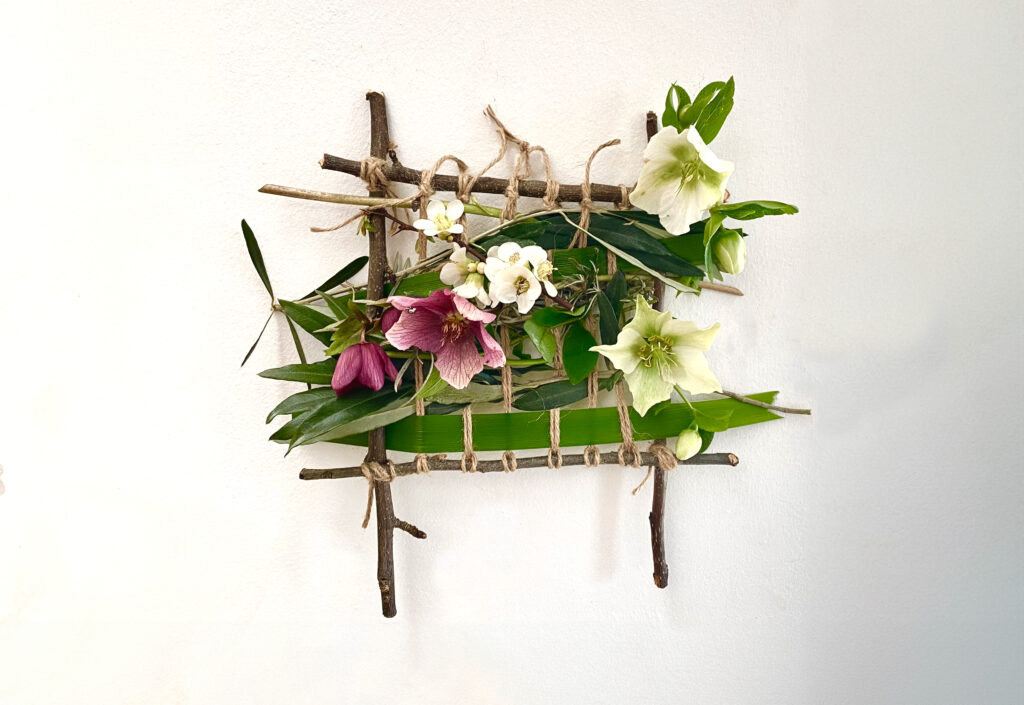
Framing Time
In this activity, you’ll be weaving a picture using materials found in the natural world around you.
This could become a lasting artwork to hang up on your wall and dry throughout autumn and winter. It can give you a lasting memory of the things you found in summer.
Process: Weaving
Weaving can be traced back thousands of years to when humans began making baskets, homes and fabric with plant fibres like leaves, branches and twigs.
It is an art and a craft with a rich and colourful history reaching far and wide across the world.
Top tip: You could make this artwork outdoors, as most of the materials you need will be found in nature. Just remember to pack scissors and the twine/string/wool you’ll need to create your weaving.
What you'll need
-
- Four strong, straight(ish) sticks of a similar size, about 20-30cm in length. Hazel wood is great but any dry fallen branches work well. You could even use chopsticks, which is a great way to recycle!
- A selection of natural materials for weaving with, such as:
-
- Long leaves and grasses – the longer and stronger the better!
- Thin branches that have fallen – maybe with leaves or flowers attached.
- Flowers with long stems
- Flower or vegetable seed heads on stems
- Seaweed
-
- Strong twine (like garden twine) or string, and/or different coloured wool(s)
- Scissors
Take care
- To wash your hands after collecting and handling natural materials
- To use scissors mindfully
What you'll do
- Bring together you need to make your weaving.
2. Now you’re going to make your loom.
3. Place two sticks vertically on a surface with a space between them.
4. Place the other two sticks horizontally across either end of the vertical sticks to form a square.
5. Cut yourself four long pieces of twine or string.
6. Carefully wrap each piece of twine or string around the corners of the frame where two sticks meet. Tie them securely with a double knot to hold the frame together.
7. Repeat for the other three corners, until you have secured the frame.
8. Once you’ve made the frame, you’ll create the warp. The warp is the vertical strings, going downwards, that hold the whole frame together. The warp remains stationery and makes the frame look a bit like a harp or string instrument!
9. Cut six pieces of twine or string, long enough to stretch from one side of the frame to the other and back again.
10. Fold one piece of twine/string in half. Take the looped part and place it over the end of one side of your frame.
11. Pass the string around the stick and thread the loose ends to create a tight loop.
12. Pull the two loose ends of the string down to the opposite side of the frame. Wrap them around the stick and tie a strong bow to hold the warp string in place.
13. Repeat this process with the five remaining pieces of twine/string, leaving the same sized gap in between.
Top tip: tying a bow at the bottom of your warp strings allows adjust the tension later if the warp strings become loose.
14. Once all the warp strings are tied, check they are tight and secure. If any feel loose, untie the bow at the bottom, pull the string tighter, and re-tie it. The tighter the warp, the better!
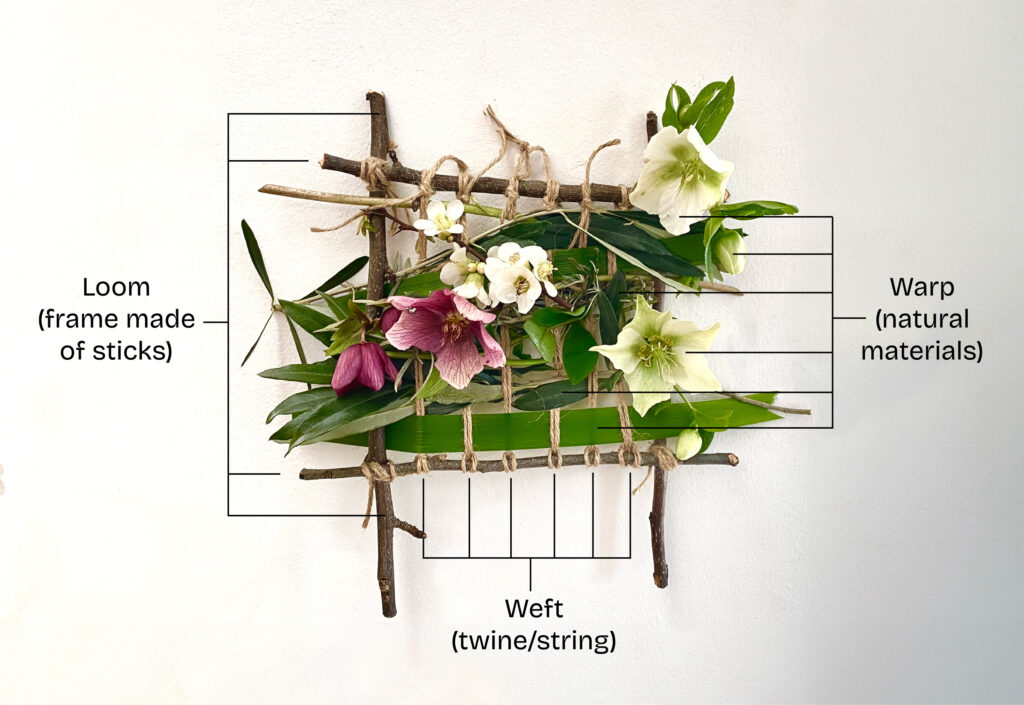
15. Now you’ve done the tricky part, it’s time for the really fun part – creating the weft!
16. To make the weft, pick up a piece of your weft material (like a long leaf or a flower on a stem,) and weave over and under the strings of the warp, one at a time.
17. Some weft materials may need securing (for example, you can tie coloured wool to the sticks at the sides), while others might naturally stay in place if held tightly by the loom (like a sturdy branch).
19. Keep adding weft materials until your whole loom is covered. Do this by gently pushing or nudging each section up towards one side of the loom using your fingers, so you can see the weaving building up from one side to the other.
Top tip: You can work on your weaving in one go or you can leave it and return to it whenever you like!
20. Once you’ve completed your weaving, tie a piece of string along the top of your loom, and find a place somewhere to proudly hang it.
21. Watch as your ‘image’ transforms slowly over time and through the seasons, as the plant materials in your weave dry in the air.
If you would like a creative challenge…
Using wool and sticks, you could try your hand at the traditional Mexican weaving known as the ‘Ojo del Dio’ or ‘Eye of God’. This website has a great tutorial, including video instructions.
Video guide
Watch a step-by-step video guide of the ‘Framing time’ activity.